Microsoft Workplace Community Blog
Setup Windows Autopilot and add existing devices
Windows Autopilot is Microsoft's modern solution that allows you to customize the Out-Of-Box Experience (OOBE) to your needs. With Autopilot you can ensure that users no longer receive 10 different screens before they are actually logged into the device. The only thing the user has to do is connect to the Wi-Fi and after connecting a custom company login page will appear, where the user has to login with his business credentials. Depending on the Intune configuration the user will be provided with various security policies and applications.
| Application | Microsoft endpoint manager (Intune) |
| Weblink |
Microsoft Endpoint Manager admin center |
| Topic | Windows Autopilot |
licensing Windows Autopilot
Windows Autopilot depends on specific capabilities available in Windows 10 and Azure Active Directory. It also requires an MDM service such as Microsoft Intune. These capabilities can be obtained through various editions and subscription programs:
To provide needed Azure Active Directory (automatic MDM enrollment and company branding features) and MDM functionality, one of the following subscriptions is required:
- Microsoft 365 Business Premium subscription
- Microsoft 365 F1 or F3 subscription
- Microsoft 365 Academic A1, A3, or A5 subscription
- Microsoft 365 Enterprise E3 or E5 subscription, which include all Windows 10, Microsoft 365, and EM+S features (Azure AD and Intune).
- Enterprise Mobility + Security E3 or E5 subscription, which include all needed Azure AD and Intune features.
- Intune for Education subscription, which include all needed Azure AD and Intune features.
- Azure Active Directory Premium P1 or P2 and Microsoft Intune subscription (or an alternative MDM service).
In this Blog
In this blog, I will describe step by step what you need to do to be able to use Windows Autopilot. Without the proper configuration, you cannot use autopilot. After completing the steps below, your environment is ready for Windows Autopilot
In this blog I will cover the following;
| Pre-configurations - Company Branding |
Microsoft Azure - Company Branding |
| Pre-configurations - Device Settings | Microsoft Azure - Device Settings |
| Pre-configurations - CNAME Validation | Microsoft endpoint Manager - CNAME Validation |
| Pre-configurations - Automatic MDM Enrollment | Microsoft endpoint Manager - Automatic MDM enrollment |
| Windows Autopilot - Dynamic Security Group | Microsoft Azure - Dynamic Security Group |
| Windows Autopilot - Enrollment Status Page | Microsoft endpoint Manager - Enrollment Status Page |
| Windows Autopilot - Deployment profiles | Microsoft endpoint Manager - Deployment profiles |
| Windows Autopilot - Add an existing Windows 10 device |
Pre-configurations Windows Autopilot
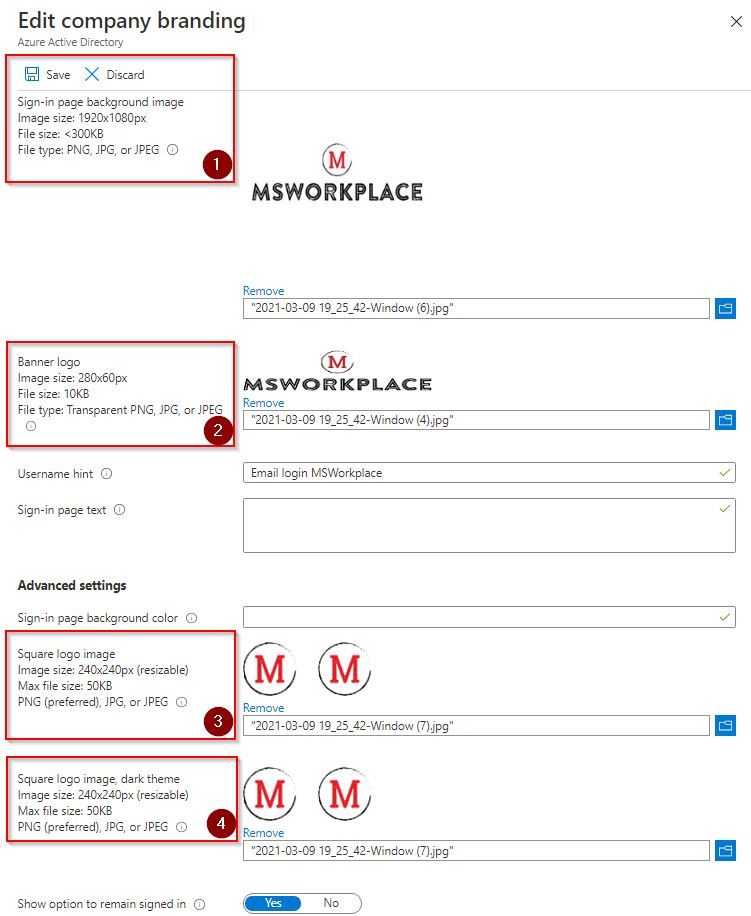
Company Branding
Microsoft Azure - Company Branding
Before Windows Autopilot can be used, Company Branding must be configured. The above link redirects directly to the correct location, make sure to login as a global administrator.
- Create "New Language"
- The following settings are required for proper functioning of autopilot.
- Background image
- Banner logo
- Background image
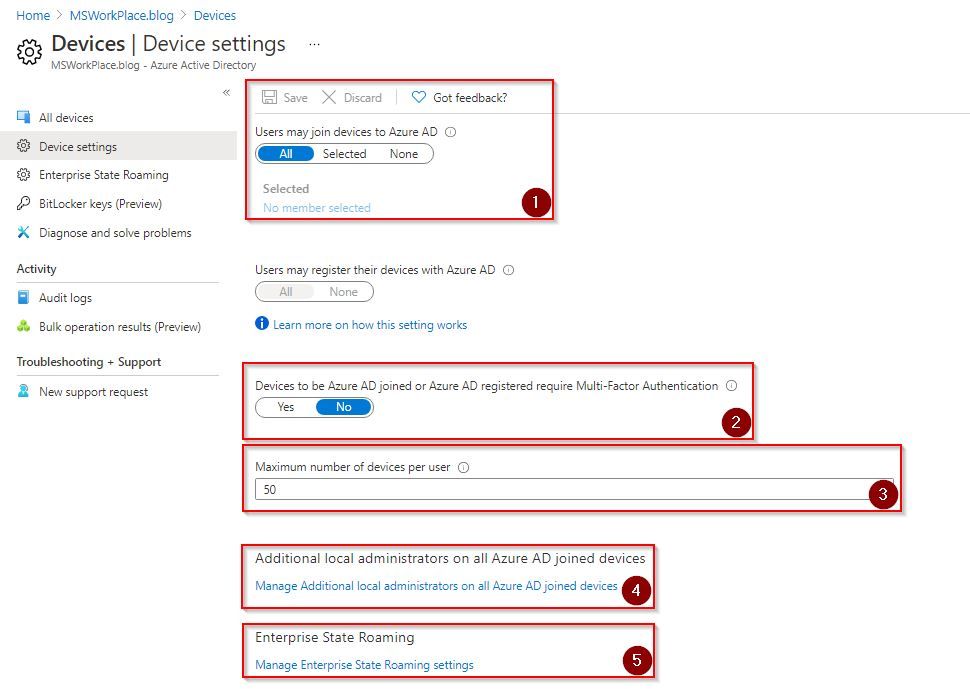
Azure Device Settings
Microsoft Azure - Device Settings
To allow users to join devices to Azure it is necessary to adjust the devices settings. Use the link above to go directly to the correct location.
- Users may join devices to Azure AD; select all or a security group. (Requirement)
- Users who are adding devices from the internet must add a second method of authentication.
- Designates the maximum number of devices a user can have in Azure AD. (Azure device Quota)
- This is where Local admins can be added; having a license is not necessary.
- For storing the user profile.

CNAME Validation
Microsoft endpoint Manager - CNAME Validation
To simplify enrollment, it is necessary to create two (DNS) alias (CNAME records). This ensures that the enrollment requests are redirected to the Intune servers.
- For the full documentation, I refer you to this page from Microsoft. Simplify Windows enrollment
- After you have added the records to your domain, you can check in the endpoint manager console whether these records are actually active. To go directly to this location use the link "CNAME Validation"

Automatic MDM Enrollment
Microsoft endpoint Manager - Automatic MDM enrollment
Use MDM auto-enrollment to manage enterprise data on your employees' Windows devices. MDM auto-enrollment will be configured for AAD joined devices and bring your own device scenarios.
- Mobile Device Management (MDM) Scope for all users or a selective group. (Required)
- Mobile application management (MAM) Scope for all users or a selective group.
Windows Autopilot Setup
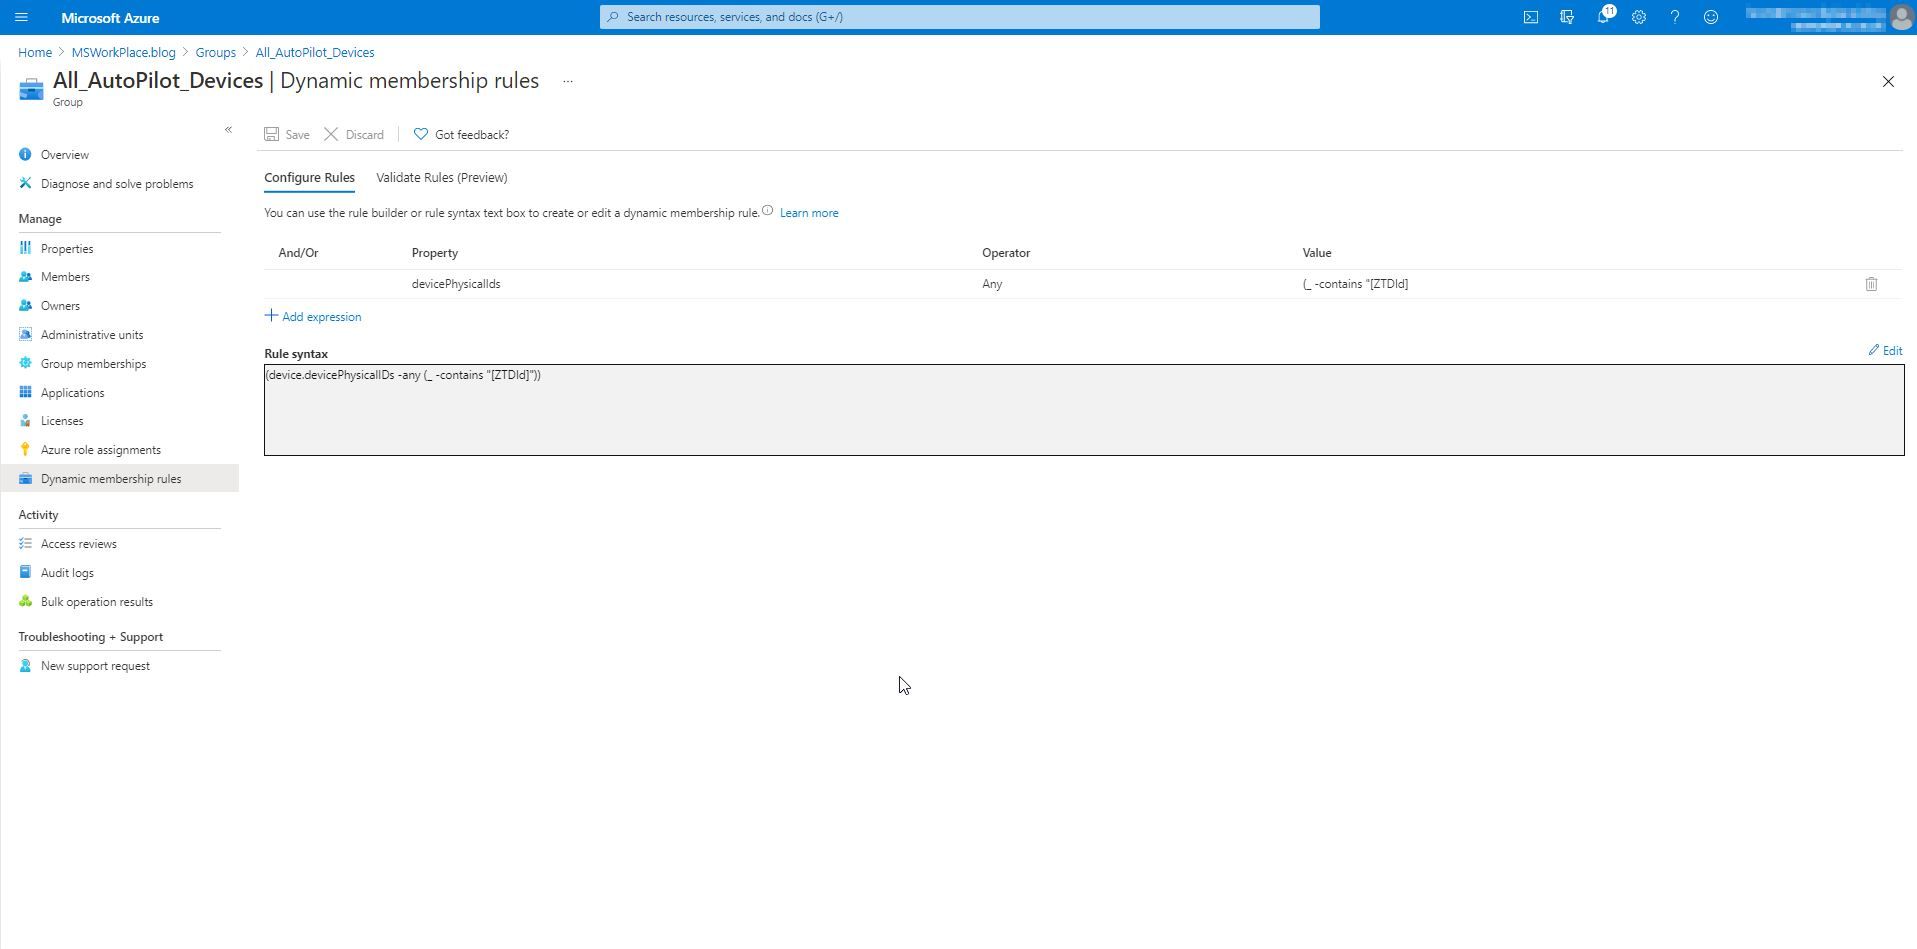
Dynamic Security Group
Microsoft Azure - Dynamic Security Group
Before we start creating an Autopilot profile, we are going to create a Dynamic Security Group. This security group will be autmatically assigned all devices added through autopilot.
- Create a new security group in Azure (New Group)
- Give it a name and optionally a description.
- Change the membership type to "dynamic Device"
- Add Dynamic Query
(device.devicePhysicalIDs -any (_ -contains "[ZTDId]"))
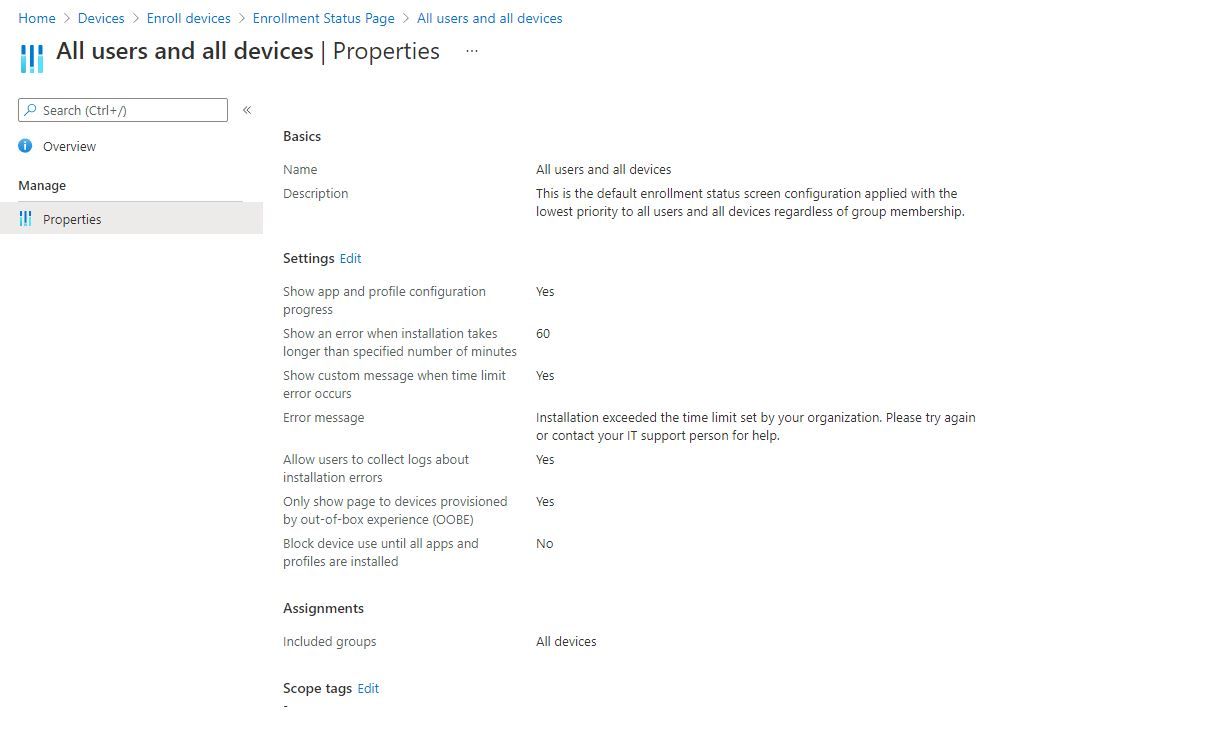
Enrollment Status Page
Microsoft endpoint Manager - Enrollment Status Page
After the user logs in to the device he will see the enrollment status page. Depending on the selected option, the user will have the possibility to use the device before everything is finished. It is also possible to block the device until certain applications are installed, for example antivirus or the office suite.
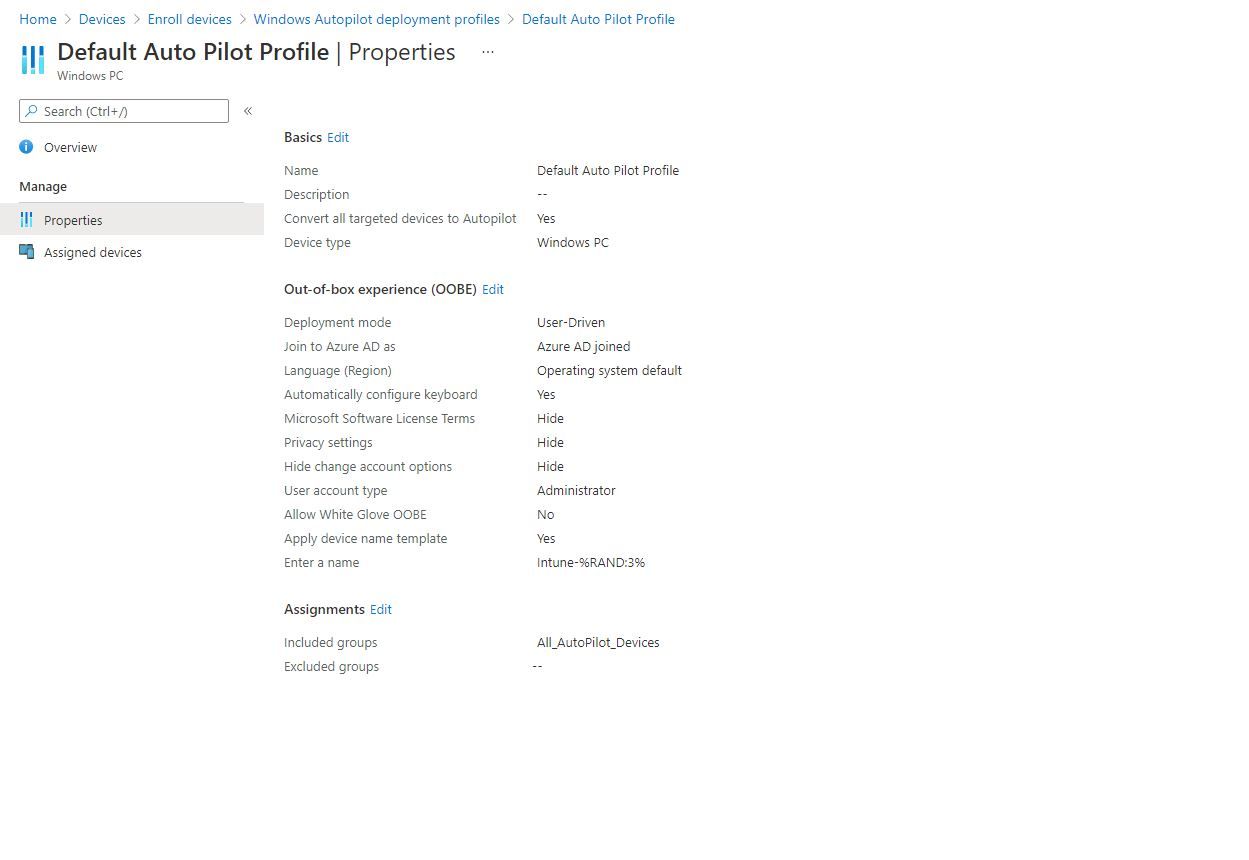
Deployment profiles
Microsoft endpoint Manager - Deployment profiles
Now that all the configuration is done, you can start creating an autopilot profile. Here you can indicate which choices a user is allowed to modify before the device can be used. Also important is that you can specify which rights a user has on the device; User or administrator.
- After creating the profile, you must assign it to the dynamic security group you have created.
Add an existing Windows 10 device

PowerShell Add device to Autopilot (CSV)
Follow these steps to add an existing Windows 10 device to Autopilot
Once your new device is installed and you are at the screen where you can select the language, press Shift + F10. If you have never used Autopilot -Online, you will be asked to give permission to use Intune PowerShell; this must be done by a user with domain admin rights.
PowerShellNew-Item -Type Directory -Path"C:\HWID"(Only needed if you want to do a CSV import)Set-Location-Path "C:\HWID"(Only needed if you want to do a CSV import)Set-ExecutionPolicy-Scope Process -ExecutionPolicy UnrestrictedInstall-Script -Name Get-WindowsAutoPilotInfoGet-WindowsAutoPilotInfo.ps1-OutputFile AutoPilotHWID.csv

PowerShell Add Device to Autopilot (Online)
Follow these steps to add an existing Windows 10 device to Autopilot.
Once your new device is installed and you are at the screen where you can select the language, press Shift + F10. If you have never used Autopilot -Online, you will be asked to give permission to use Intune PowerShell; this must be done by a user with domain admin rights.
PowerShellSet-ExecutionPolicy-Scope Process -ExecutionPolicy UnrestrictedInstall-Script -Name Get-WindowsAutoPilotInfoGet-WindowsAutoPilotInfo.ps1 -AssignedUser "User UPN Name" -AssignedComputerName "Fixed device name" -Online
- AssignedUser : If you want to assign this device directly to a user you can add this parameter followed by the UPN of the user (optional)
- AssignedComputerName : To give this device a fixed name. The device will keep this name, even after a factory reset. (optional)
- GroupTag : If you have more than one autopilot profile you can assign a group tag.
- Online : To directly add this device to the Autopilot services without creating an output file that needs to be imported manually. Make sure -Online is on the end of the commend

PowerShell Add Device to Autopilot (Intune PowerShell)
Follow these steps to add an existing Windows 10 device to Autopilot.
Once your new device is installed and you are at the screen where you can select the language, press Shift + F10. If you have never used Autopilot -Online, you will be asked to give permission to use Intune PowerShell; this must be done by a user with domain admin rights.
- In the image you can see what the permission looks like.
See how it looks
When you subscribe to the blog, we will send you an e-mail when there are new updates on the site so you wouldn't miss them.
About the author
Blog Categories
Latest Comments